Ask For A Quick Quote
Wonderful, you have made the right choice. We will never let you down!
We will contact you within 2 hours of working days, please pay attention to the email with the suffix “@sannytelecom.com”.

As a professional antenna manufacturer, we offer clear guides to help you install, test, and design various antennas quickly and efficiently.
At Sanny Telecom, we are dedicated to delivering not only high-performance antennas but also a comprehensive support experience that ensures your installation and usage are seamless and effective. As a leading professional antenna manufacturer, we simplify the entire process—from design and manufacturing to testing and installation.
Our expert team meticulously designs and engineers each antenna to meet the highest standards of performance and reliability. We employ advanced design techniques and cutting-edge simulation tools to optimize antenna parameters such as radiation patterns, axial ratio, isolation, VSWR, and etc, ensuring superior signal quality and connectivity.
To guarantee the quality and performance of every antenna, we conduct rigorous electrical testing in our state-of-the-art laboratories. This includes detailed measurements of radiation patterns to verify directional coverage, axial ratio testing for circular polarization accuracy, and VSWR analysis to ensure minimal signal reflection and maximum power transfer. Our commitment to thorough testing means you receive antennas that perform exactly as specified, providing exceptional connectivity in real-world conditions.
For your convenience, we provide clear, step-by-step written and video tutorials that guide you through every stage of antenna installation. Whether you’re mounting your antenna on a mast or a wall, our easy-to-follow instructions help you achieve a secure and optimal setup quickly and hassle-free. Whether you’re a first-time installer or an experienced professional, our resources empower you to get connected with confidence.
Additionally, for those interested in the antenna manufacturing process, we offer insights into how antennas are made—from initial design concepts and material selection to precision fabrication and quality assurance. Our transparency and expertise make Sanny Telecom a trusted partner not only for purchasing antennas but also for understanding the technology behind them.
Choose Sanny Telecom for antennas that combine cutting-edge design, rigorous testing, and user-friendly installation support. Experience exceptional connectivity backed by our dedication to quality, innovation, and customer success.
We’re here to make installing your antenna simple and efficient with our easy-to-follow guides, tailored specifically for omni-directional antennas, panel antennas, and parabolic dish antennas. Our step-by-step instructions cover three key stages: preparation, mounting, and angle adjustment for optimal signal quality. Whether you’re installing an omni antenna for 360-degree coverage, a panel antenna for directional reliability, or a parabolic dish for high-gain precision, we’ve got you covered.
Our guides include a list of essential tools—such as wrenches, screwdrivers, leveling tools, and waterproof tape—and provide tips specific to each antenna type. We also address important factors like line of sight, wind resistance, and the best mounting practices to ensure maximum performance in any environment.
Ready to get started? Check out our sample guides online and see how easy it is to set up your high-performance antenna system! (Note: These materials are designed specifically for our advanced antenna solutions.)
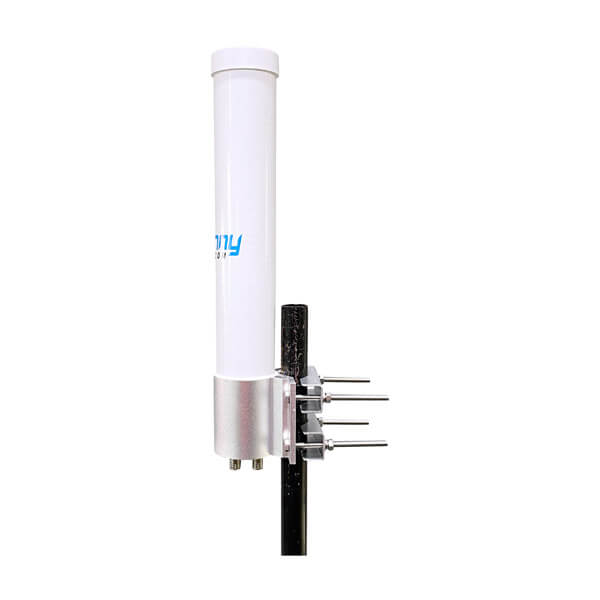
Just received your omni antennas? This guide shows you how to easily install them on the mast step by step.
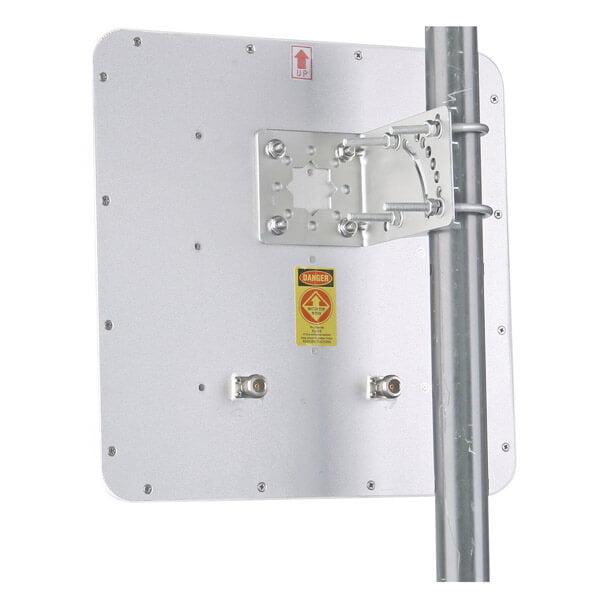
Just received your panel antennas? This guide shows you how to easily install them on the mast step by step.
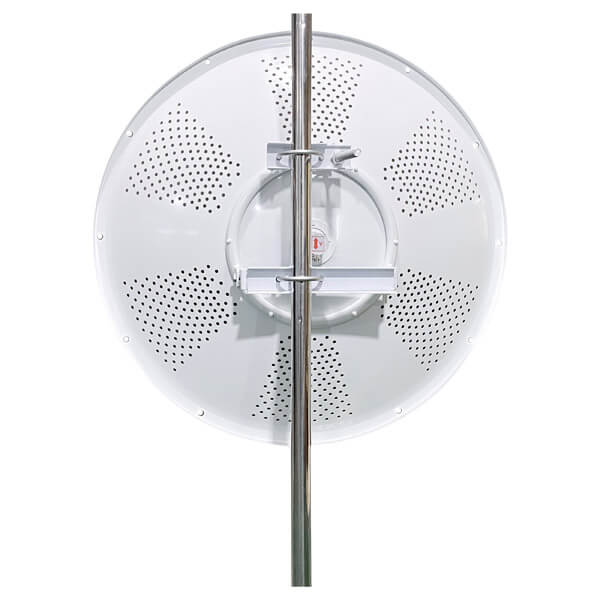
Just received your parabolic dish antennas? This guide shows you how to easily install them on the mast step by step.
Installing antennas properly and easily is crucial for ensuring optimal performance. That’s why we’ve created a series of simple, step-by-step videos to guide you through the installation process based on the type of antenna and mounting bracket you’re using.
From start to finish, these videos are designed to make installation straightforward and hassle-free. To help you find exactly what you need, they’re organized by antenna and bracket type, so you can get the right guidance quickly.
Klicken Sie auf den untenstehenden Link, um unsere Installationsvideos anzusehen und loszulegen!
Zur Verwendung mit Sanny Telecom Modellen: STD5G30M2-PRO, STD6G30M2-PRO, STD5G34M2-PRO, STD6G34M2-PRO, STD4971G34M2-PRO usw.
Ab dem Moment, in dem Sie Ihre Parabolantenne erhalten, führt Sie dieses Video Schritt für Schritt durch die erfolgreiche Installation auf einem Mast.
Schritt 1 Platzieren Sie die Parabolantenne auf einer ebenen Oberfläche und befestigen Sie die Montagehalterung mit M10-Befestigungselementen an der Antenne.
Schritt 2 Befestigen Sie den Horn an der Antenne mit 4x M4-Befestigungen.
Schritt 3 Installieren Sie die Antenne an einem vertikalen Pfosten mit dem Neigungsjustierungsstab am unteren Ende.
Schritt 4 Die Azimut-Ausrichtung wird durch Drehen der Antenne am Pfosten erreicht. Nach der Ausrichtung die Muttern an den U-Bolts sichern.
Schritt 5 Die Elevationsneigung (bis zu +/- 15 Grad) kann mit dem Neigungsjustierungsstab eingestellt werden. Sobald die Antenne den gewünschten Neigungswinkel hat, die M16-Muttern am Justierungsstab sichern.
For use with Sanny Telecom Models: STD5G23M2, STD6G23M2, STD5G25M2, STD6G25M2, etc.
For use with Sanny Telecom Models: STD5G30M2, STD5G30M2-2PK, STD6G30M2, STD6G30M2-2PK, etc.
For use with Sanny Telecom Models: ST-SH6G11B90M2-HP,ST-SH6G14B60M2-HP, ST-SH6G16B45M2-HP, ST-SH6G20B30M2-HP
Ab dem Moment, in dem Sie Ihre Panelantenne erhalten, führt Sie dieses Video Schritt für Schritt durch die erfolgreiche Installation an einem Mast.
Schritt 1 Überprüfen Sie die Anzahl der Teile und Zubehörteile;
Schritt 2 Assemble Mounting Bracket as shown;
Schritt 3 Attach the Mounting Bracket to the Horn Antenna;
Schritt 4 Insert the M8x85 Bolt to the Middle Clamp of Mount Bracket:
Schritt 5 Attach the Mounting Bracket to the Mast;
Step 6 Adjust the mounting angle of the antenna;
Step 7 Ziehen Sie alle Unterlegscheiben und Muttern fest
Ab dem Moment, in dem Sie Ihre Panelantenne erhalten, führt Sie dieses Video Schritt für Schritt durch die erfolgreiche Installation an einem Mast.
Schritt 1 Überprüfen Sie die Anzahl der Teile und Zubehörteile;
Schritt 2 Befestigen Sie die L-Halterung an den vier Abstandshaltern der Antennenrückplatte mit der Flanschmutter;
Schritt 3 Befestigen Sie die L-Bügelhalterung am Mast und befestigen Sie die U-Bolts um den Mast und sichern Sie sie mit zwei Klammern
Schritt 4 Stellen Sie den Montagewinkel der Antenne ein;
Schritt 5 Ziehen Sie alle Unterlegscheiben und Muttern fest
Zur Verwendung mit Sanny Telecom Modellen: STP24G18HVM2, STP2458G19XM2, STP2472G19HVM6
For use with Sanny Telecom antenna series: RFID antennas, panel antennas, etc.
cURL Too many subrequests by single Worker invocation. To configure this limit, refer to https://developers.cloudflare.com/workers/wrangler/configuration/#limits.
Schritt 1 Überprüfen Sie die Anzahl der Teile und Zubehörteile;
Schritt 2 cURL Too many subrequests by single Worker invocation. To configure this limit, refer to https://developers.cloudflare.com/workers/wrangler/configuration/#limits;
Schritt 3 cURL Too many subrequests by single Worker invocation. To configure this limit, refer to https://developers.cloudflare.com/workers/wrangler/configuration/#limits;
Schritt 4 cURL Too many subrequests by single Worker invocation. To configure this limit, refer to https://developers.cloudflare.com/workers/wrangler/configuration/#limits ;
Schritt 5 Adjust the mounting angle of the antenna;
Step 6 Ziehen Sie alle Unterlegscheiben und Muttern fest
Zur Verwendung mit Sanny Telecom Modellen: STR8G9C-PRO, STR9G9C-PRO
Ab dem Moment, in dem Sie Ihre RFID-Antenne erhalten, wird dieses Video Sie Schritt für Schritt bei der erfolgreichen Installation auf einem Mast anleiten.
Schritt 1 Überprüfen Sie die Anzahl der Teile und Zubehörteile;
Schritt 2 Befestigen Sie die L-Halterung an den vier Abstandshaltern der Antennenrückplatte mit der Flanschmutter;
Schritt 3 Befestigen Sie die L-Bügelhalterung am Mast und befestigen Sie die U-Bolts um den Mast und sichern Sie sie mit zwei Klammern
Schritt 4 Stellen Sie den Montagewinkel der Antenne ein;
Schritt 5 Ziehen Sie alle Unterlegscheiben und Muttern fest
cURL Too many subrequests by single Worker invocation. To configure this limit, refer to https://developers.cloudflare.com/workers/wrangler/configuration/#limits
cURL Too many subrequests by single Worker invocation. To configure this limit, refer to https://developers.cloudflare.com/workers/wrangler/configuration/#limits
cURL Too many subrequests by single Worker invocation. To configure this limit, refer to https://developers.cloudflare.com/workers/wrangler/configuration/#limits.
cURL Too many subrequests by single Worker invocation. To configure this limit, refer to https://developers.cloudflare.com/workers/wrangler/configuration/#limits.
cURL Too many subrequests by single Worker invocation. To configure this limit, refer to https://developers.cloudflare.com/workers/wrangler/configuration/#limits.
cURL Too many subrequests by single Worker invocation. To configure this limit, refer to https://developers.cloudflare.com/workers/wrangler/configuration/#limits.
cURL Too many subrequests by single Worker invocation. To configure this limit, refer to https://developers.cloudflare.com/workers/wrangler/configuration/#limits
cURL Too many subrequests by single Worker invocation. To configure this limit, refer to https://developers.cloudflare.com/workers/wrangler/configuration/#limits cURL Too many subrequests by single Worker invocation. To configure this limit, refer to https://developers.cloudflare.com/workers/wrangler/configuration/#limits cURL Too many subrequests by single Worker invocation. To configure this limit, refer to https://developers.cloudflare.com/workers/wrangler/configuration/#limits.
cURL Too many subrequests by single Worker invocation. To configure this limit, refer to https://developers.cloudflare.com/workers/wrangler/configuration/#limits cURL Too many subrequests by single Worker invocation. To configure this limit, refer to https://developers.cloudflare.com/workers/wrangler/configuration/#limits Use special materials to block signal reflections and keep the environment steady.
Step 3: Run the Tests Rotate the antenna and measure signal strength, gain, polarization, and signal matching.
Step 4: Analyze Results Look at the data, write a report, and fix any issues if needed.
Step 5: Follow Safety Rules Keep the room quiet, manage cables well, and stay safe around high-frequency signals.
If you cannot find sufficient information on this pages, Click the “Submit Your Question” and fill in your questions.
We will reply to you within 24 hours and to make sure the information is understandable, If your question is adopted by Sanny Telecom and showing in the Video Pages.
You will get 2% discount or 300 USD coupon in your first order, your email address will be the only evidence.
Wonderful, you have made the right choice. We will never let you down!
We will contact you within 2 hours of working days, please pay attention to the email with the suffix “@sannytelecom.com”.
Send us a message if you have any questions or request a quote. We will be back to you ASAP!