 Skip to content

Hey there! I’ve spent the better part of the last decade elbow-deep in wireless tech. I’ve seen WiFi evolve from a “nice-to-have” to the absolute backbone of our connected lives. With the full rollout of WiFi 6E and the exciting dawn of WiFi 7, things are getting seriously powerful, but also a bit more complex. Choosing the right antenna is no longer a simple afterthought – it’s crucial for unlocking the full potential of these new standards. In this guide, I’m going to break it all down for you, friend-to-friend, so you can make the best choice for your setup.
Selecting the right antenna for WiFi 6, 6E, or 7 in 2025 depends on your specific needs. For general home use with WiFi 6 or 6E, a dual-band or tri-band omni-directional antenna with at least 5 dBi of gain is a solid starting point. For the emerging WiFi 7 standard, you’ll want to look for tri-band antennas that are specifically designed to support the 6 GHz band and advanced features like Multi-Link Operation (MLO). If your goal is to cover a large, open area or establish a connection to a distant signal, a directional antenna, such as a sector antenna, will be your best bet. Always ensure that the frequency range of the antenna matches the capabilities of your router, whether it’s 2.4 GHz, 5 GHz, and/or 6 GHz.
But that’s just scratching the surface. To really nail your decision and understand why these choices matter, let’s dive deep into the world of WiFi antennas. I promise to make it painless and maybe even a little fun.
What’s the Big Deal with WiFi 6, 6E, and 7?
I know, I know, the numbers and letters can seem like alphabet soup. But trust me, understanding the basics is key to picking the right gear. It’s like knowing the difference between a four-cylinder engine and a V8 before you buy a car. They’ll all get you there, but how they do it is vastly different.
WiFi 6 (802.11ax): The Efficiency King
Think of WiFi 6 not just as a speed boost, but as a smart traffic cop for your increasingly crowded network. In the past, your router could only “talk” to one device at a time, just really, really fast. It was like a frantic single-person delivery service, racing to each house one by one. This worked fine when you just had a laptop and a phone. But now? Now you have smart TVs, gaming consoles, tablets, smart watches, security cameras, and even a smart toaster. Your network is a crowded cul-de-sac.

This is where WiFi 6 shines. It introduced a couple of game-changing technologies:
OFDMA (Orthogonal Frequency-Division Multiple Access): This is the big one. Instead of making one trip per device, OFDMA allows the router to bundle data for multiple devices into a single transmission. Imagine that a delivery truck can now drop off packages to several different houses in one single trip. It’s a massive leap in efficiency, reducing latency (lag) and making everything feel snappier, especially when many devices are active.
MU-MIMO (Multi-User, Multiple-Input, Multiple-Output): While this existed before, WiFi 6 supercharged it. It allows the router to communicate with multiple devices simultaneously. It’s like giving our delivery driver a few extra sets of hands to deliver multiple packages at the exact same time.
WiFi 6 accomplishes all of this on the traditional 2.4 GHz and 5 GHz frequency bands. So, while it’s much smarter, it’s still driving on the same familiar roads.
WiFi 6E: The Exclusive New Highway
This is where things get really interesting. WiFi 6E is everything I just described about WiFi 6, but with a VIP pass to a brand new, exclusive superhighway: the 6 GHz frequency band. For decades, our WiFi has been crammed onto the 2.4 GHz and 5 GHz bands, sharing them with everything from microwaves to baby monitors and your neighbor’s twenty-seven “smart” lightbulbs. The result? Interference and congestion.
But here’s where things get especially interesting: WiFi 6E—where the “E” stands for “extended”—still follows the same IEEE 802.11ax standard as WiFi 6, but now operates in the 6 GHz band (specifically, from 5.925 GHz all the way up to 7.125 GHz). So, what you get is all the efficiency, speed, and smart traffic management of WiFi 6, turbocharged by access to a pristine chunk of radio spectrum that’s been off-limits until now.
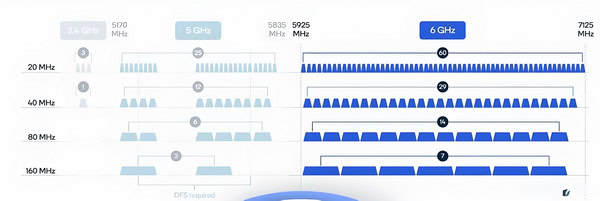
The 6 GHz band is a massive, pristine stretch of radio spectrum with room for up to seven extra-wide 160 MHz channels.
Imagine you’ve been commuting on a two-lane country road your whole life, and suddenly the government opens a brand new, eight-lane, empty expressway right next to it. That’s WiFi 6E. This means less interference from other devices, leading to more stable connections and significantly higher speeds.
Why this matters for antennas: It’s simple. To drive on this new expressway, you need a car that can access the on-ramp. Your old dual-band antennas, which only “listen” for 2.4 GHz and 5 GHz, are completely deaf to the 6 GHz band. You absolutely need a tri-band antenna specifically designed to operate on 6 GHz to get any of the benefits of WiFi 6E.
How WiFi 6E Plays with Other Wireless Standards
Now, you might be wondering: if WiFi 6E is blazing down this new 6 GHz expressway, what happens to all those other wireless gadgets buzzing around your house—things like Bluetooth speakers, Zigbee smart bulbs, or Thread-enabled sensors? Great question!
Here’s the scoop: WiFi 6E doesn’t operate in a vacuum. In fact, one of its biggest perks is that it helps everybody get along. Since 6E devices can offload heavy WiFi traffic to the wide-open 6 GHz band, that leaves the 2.4 GHz and 5 GHz lanes less congested for legacy tech. That means less chance of your WiFi stomping on weaker signals from those Zigbee or Bluetooth gadgets. Translation: your smart lights will talk to your phone without hiccups, and your wireless headphones won’t get drowned out by Netflix marathons.
Even cooler, many modern routers and smart hubs are integrating support for WiFi 6E and these other standards. So you’ll often find routers that can juggle WiFi, Bluetooth, Zigbee, and even Thread all at once. It’s like a friendly neighborhood block party—everyone gets what they need, and nobody’s left out.
So, with WiFi 6E, not only do you get that sparkling-fast lane for your WiFi, but you also make life easier for every other wireless gadget in your home. Everybody wins!
WiFi 7 (802.11be): The Future is Now
Hold onto your hats, because WiFi 7 is the beast of the bunch. Officially dubbed “Wi-Fi CERTIFIED 7™” in early 2024, this standard is all about raw, unadulterated performance. We’re talking theoretical speeds that are multiple times faster than WiFi 6, and latency so low it’s nearly imperceptible. This is the technology that will power true real-time AR/VR, cloud gaming without a hitch, and 8K streaming as a baseline.

The absolute superstar feature of WiFi 7 is Multi-Link Operation (MLO).
MLO allows a single device, like your phone or laptop, to connect to the router across multiple frequency bands ‘at the same time’. It can simultaneously send and receive data over the 5 GHz and 6 GHz bands, for example.
Think of it this way: if WiFi 6 was an efficient delivery truck, WiFi 7 is a fleet of helicopters, trucks, and motorcycles all delivering packages to your house at once, coordinated perfectly. This not only skyrockets the speed but also makes the connection incredibly resilient. If one band gets congested, the traffic seamlessly shifts to the other, without you ever noticing a drop.
“Why this is a game-changer for antennas”: MLO puts immense pressure on your antennas. You don’t just need a tri-band antenna; you need a ‘high-performance’ tri-band antenna with excellent isolation between the bands. The system must be able to juggle these multiple connections flawlessly without them interfering with each other. This is where quality really starts to matter.
Antenna Fundamentals You Really Need to Know
Let’s get one thing straight: not all antennas are created equal. You can have the most expensive, powerful WiFi 7 router on the market, but if you connect it to cheap, poorly designed antennas, you’ve essentially bought a Ferrari and put bicycle tires on it. Your router’s performance is literally riding on these little sticks (or panels). Let’s break down the specs you’ll see on a product page into plain English.
Gain (dBi): It’s Not About Brute Strength
This is the most common spec people look at, and the most misunderstood. “Gain” measured in dBi (decibels relative to an isotropic radiator), does not mean the antenna creates more power. An antenna is a passive device; it can’t amplify the signal.
Instead, gain is a measure of how well the antenna focuses the router’s energy in a particular direction.
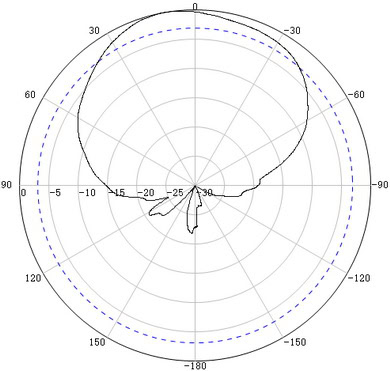
A low-gain antenna (like 2 dBi) acts like a bare lightbulb, spreading the signal out more or less equally in all directions (a spherical or donut shape).
A high-gain antenna (like 9 dBi) acts like a flashlight or spotlight, concentrating that same amount of energy into a narrower, more focused beam.
Higher dBi isn’t always better. I once had a friend who lived in a small, two-story apartment. He bought these massive 12 dBi “super” antennas for his router, thinking it would give him a crazy-strong signal everywhere. He placed the router on his desk downstairs. The result? The signal on the first floor was incredible, but upstairs it was almost non-existent. Why? Because the high-gain antennas had focused the signal into a very flat, narrow disc, essentially “shouting” horizontally and “whispering” vertically. For his space, a lower-gain 5 dBi antenna, which has a more donut-shaped pattern, would have provided much better coverage to both floors.
My rule of thumb:
- Small to medium, single-floor home/apartment: 3-5 dBi is perfect.
- Large, single-floor home or long, narrow space: 6-9 dBi can help push the signal to the far corners.
- Multi-story home: Stick with lower-to-mid gain (3-5 dBi) antennas and focus on central placement, or consider a mesh system.
Radiation Patterns: Where is Your Signal Going?
This is directly related to gain. The “radiation pattern” is a visual representation of how an antenna broadcasts its signal. You don’t need to analyze complex charts, but you should know the two main types:
Omni-Directional: This is the most common type of antenna that comes with home routers. They are designed to send the signal out in a 360-degree horizontal pattern. As we discussed, think of a donut shape around the antenna. This is ideal for central placement in a home or office where you need to provide coverage in all directions on a single floor.

Directional: These antennas are the spotlights of the WiFi world. They focus all their energy in a single, specific direction. Types include “panel” antennas (which look like a small white box), “Yagi” antennas (which look like the old TV antennas on roofs), and “dish” antennas (think of a small satellite dish, often with a curved reflector behind the feed).

You would use a directional antenna for very specific scenarios, such as:
- Beaming a signal from your house to a detached garage or workshop.
- Providing coverage down a very long, narrow hallway.
- Picking up a weak public WiFi signal from a distance (like in an RV park).
- Or, with a dish antenna, focusing your signal across even longer distances—almost like using a magnifying glass for WiFi.
Using a directional antenna for general home coverage is a terrible idea. It would be like trying to light up your living room with a laser pointer (or, in the case of a dish antenna, a magnifying glass).
Half-Power Beamwidth: The Spotlight of Your Signal
Ever wonder why some WiFi antennas seem to cover a whole house, while others are more “laser-focused”? That’s where half-power beamwidth comes in. Think of it as the spotlight of your antenna’s signal—the angle where the signal strength is at least half of its maximum.
Picture this: If your antenna were a flashlight, the half-power beamwidth would be how wide the main beam shines before it starts to get dim. A wide beamwidth (like 90° or 120°) means your antenna spreads its signal out over a big area—great for covering lots of space, but maybe not so hot for reaching far-off corners. A narrow beamwidth (say, 30° or less) is more like a focused spotlight: it can reach further, but only in a specific direction.
Why does this matter? Well, if you want to blanket a room with WiFi, you want a wide beam. But if you need to shoot a signal down a hallway or to a specific part of your house, a narrower beamwidth can help concentrate the power where you need it most. And just like with all the other specs, there’s no “one size fits all”—it depends on your space and your needs.
So, in short: Half-power beamwidth tells you how wide your antenna’s “sweet spot” is. The right beamwidth helps make sure your WiFi signal shines exactly where you want it—no more, no less!
Polarization: The Secret Handshake of Antennas
Have you ever noticed that some people position their router antennas straight up, while others angle them? Part of this relates to “polarization.” Antennas have a polarization, which is the orientation of the electric field they radiate. For WiFi, this is typically “linear polarization”(either vertical or horizontal).
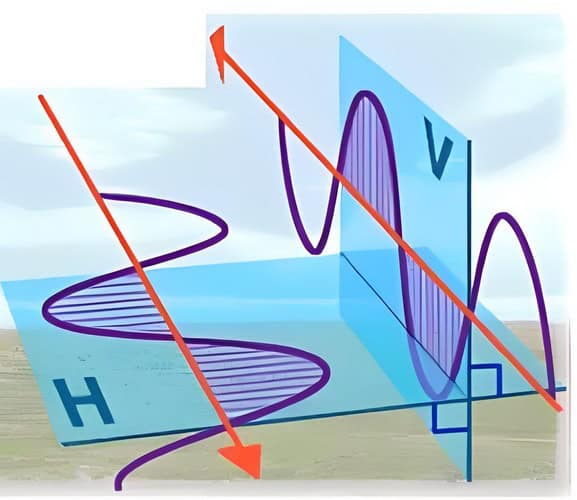
For the best possible connection, the antenna on the receiving device (your laptop) should have the same polarization as the antenna on the transmitting device (your router). Now, since you can’t control the orientation of the tiny internal antenna in your phone, the best practice is to set your router’s antennas at different angles. For a router with two antennas, setting one vertical and one horizontal is a common trick. For three or more, angling them at various positions (like 90, 45, and 135 degrees) helps ensure that no matter how the client device is oriented, one of its antennas will have a good “handshake” with one of the router’s antennas.
VSWR (Voltage Standing Wave Ratio): The Efficiency Score
Okay, this one is a bit more technical, but it’s a huge indicator of antenna quality. You’ll often see it listed on spec sheets from reputable manufacturers. In simple terms, VSWR is a measure of how efficiently the antenna transmits the power it receives from the router.
Ideally, all the power from the router goes to the antenna and gets radiated out as a WiFi signal. In reality, some of that power is reflected back toward the router due to an impedance mismatch. This reflected power can create interference and even damage the router over time.
VSWR is the ratio of these signals. A perfect antenna would have a VSWR of 1:1. That’s impossible in the real world.
An excellent VSWR is under 1.8:1. This means very little power is being reflected, which is ideal but can be difficult to achieve, especially with dual-band or triple-band antennas like those used for WiFi 6, 6E, and 7.
- A good VSWR is between 1.8:1 and 2.0:1.
- Anything over 2.3:1 is generally considered poor.
Cheaper, no-name antennas often have terrible VSWR ratings. This is one of the hidden factors that makes a quality antenna from a trusted brand outperform a knock-off, even if they both claim to have the same “gain.”
Port-to-Port Isolation: Keeping the Antennas from Gossiping
Here’s another behind-the-scenes WiFi trick: port-to-port isolation. If you’ve got a fancy router with multiple antennas (especially on WiFi 6 and beyond), you want each antenna to do its job without “listening in” on its neighbors. That’s what port-to-port isolation is all about.
In plain English, port-to-port isolation measures how much signal from one antenna leaks into another antenna’s port. High isolation means the antennas are minding their own business—no eavesdropping, no interference, just pure, clean signals. If the isolation is poor, your router’s antennas can end up “talking over” each other, causing cross-talk and reducing overall performance. Not ideal!

So, what’s a good number? For WiFi gear, you’ll often see isolation specs like 20 dB or higher. The higher the number, the less interference between antennas, and the better your router can juggle multiple streams of data. It’s especially important for MIMO (multiple-input, multiple-output) setups, where each antenna is supposed to be an independent channel.
In summary: Good port-to-port isolation helps your router’s antennas cooperate without stepping on each other’s toes—making your WiFi faster and more reliable, no matter how many devices are connected.
Types of WiFi Antennas for WiFi 6/6E/7
Alright, let’s get into the nitty-gritty. You wouldn’t use a screwdriver to hammer a nail, right? Same deal with WiFi antennas. Picking the right type of antenna is just as important as obsessing over the specs on the box. And with WiFi 6, 6E, and the beastly WiFi 7, using the right antenna can be the difference between a good network and a great one.
Let’s break down the main players you’ll run into.
Internal vs. External Antennas – The Great Debate
Ever seen one of those super-sleek, minimalist routers that look like modern art and wondered, “Where are the antennas?” Don’t worry—they’re in there! They’re just tucked away inside the casing. This brings us to the first big choice: internal vs. external antennas.
Internal Antennas
These are built right into the device—think routers, laptops, tablets.
- Pros: They look clean, and you don’t have to worry about breaking or knocking them off. Plus, manufacturers can tune them perfectly for that device.
- Cons: You can’t adjust, reposition, or upgrade them. Whatever performance you get out of the box is what you’re stuck with. And while they’ve gotten better, they usually have lower gain than external antennas.
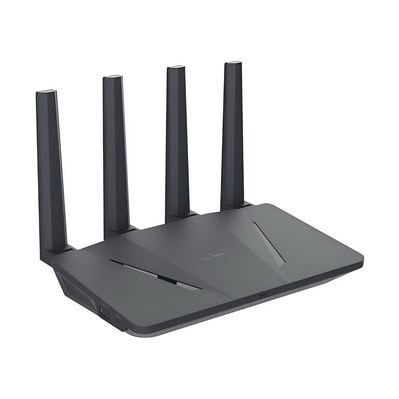
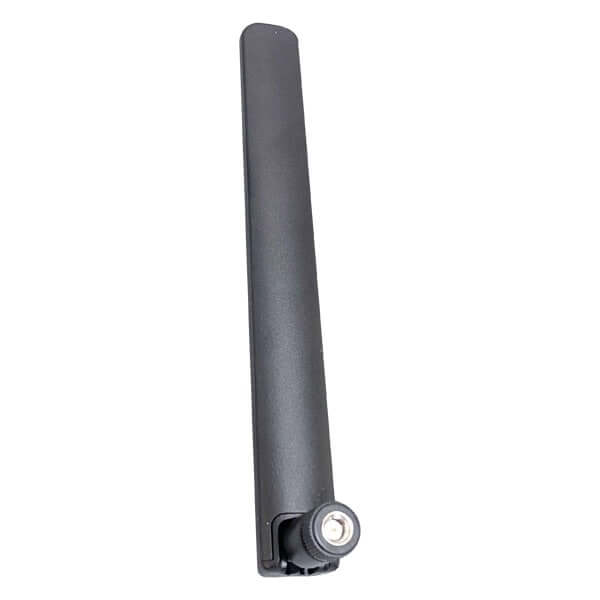
You know those adjustable “sticks” you see sticking out of high-performance routers? Yep, those are external antennas.
- Pros: You can upgrade and adjust them, which is a massive win. You can physically aim your signal where you need it most. Generally, they offer better range and more flexibility.
- Cons: Let’s be real—a router with eight antennas can look like a mechanical spider. Not exactly subtle. And they can get damaged if you’re not careful.
My take: I get the appeal of a clean, antenna-free look. But for me—and anyone serious about squeezing every last drop of performance out of their network—external antennas are the only way to go. Being able to aim your signal and upgrade to a higher-gain model later is a benefit you just can’t ignore.
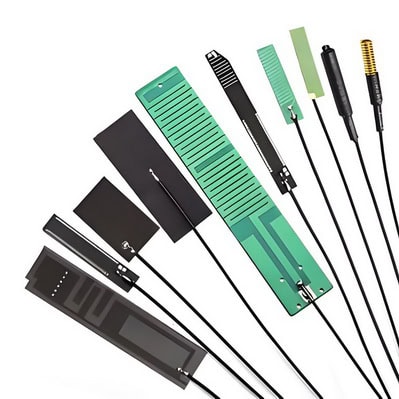
Formats and Materials in Embedded WiFi 6E Antenna Solutions
Now, what about the guts of the antenna itself? Embedded WiFi 6E antennas come in a handful of clever formats, each aimed at balancing size, flexibility, and performance—especially inside today’s impossibly slim gadgets.
- Surface-mount PCB antennas: These are soldered right onto the device’s circuit board. Think of them as the “stealth” option—no moving parts, just a thin trace of copper doing all the heavy lifting.
- Through-hole PCB antennas: Similar to surface-mount, but plugged through the board instead. Slightly bulkier, but sometimes a better fit for devices that need a more secure attachment or specific placement inside the case.
- Cabled PCB antennas: Here, the antenna is on a small PCB with a shielded cable attached. This lets manufacturers tuck the antenna exactly where it fits best—perfect for cramming good signal in awkward spaces.
- Flexible adhesive-mount antennas: These use ultra-thin, bendy materials (often polyimide or flexible plastic) and stick right onto an interior surface. They go where rigid PCBs can’t, bending around corners or fitting into tight gaps.
In short, modern embedded antennas use everything from rigid circuit boards to super-flexible plastics—whatever it takes to squeeze WiFi 6E’s power into the smallest possible space, while keeping your device sleek and signal strong.
SISO vs. MIMO Antennas – The One vs. Many Game
Let’s clear up a classic WiFi puzzle: SISO vs. MIMO antennas. You’ve probably seen these terms tossed around in spec sheets, but what do they actually mean for your WiFi experience?
SISO (Single Input, Single Output)
What it is: SISO is the old-school way—one antenna sending and one antenna receiving. Imagine a single-lane road: only one car (or data stream) can go through at a time.

- Pros: It’s simple, reliable, and totally fine for basic connections or older, slower WiFi standards.
- Cons: You’re limited to one stream of data at a time. If you’ve got a bunch of devices or want blazing speeds, SISO just can’t keep up these days.
MIMO (Multiple Input, Multiple Output)
What it is: MIMO is the modern upgrade—multiple antennas sending and receiving data all at once. Think of it as turning that single-lane road into a multi-lane highway. Suddenly, lots of cars (data streams) can move at the same time.
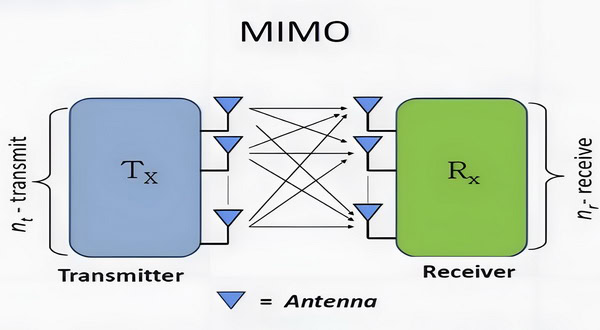
- Pros: Massive speed and capacity boost! MIMO lets your router talk to several devices at once, or even send multiple data streams to a single device. This is the magic behind WiFi 6, 6E, and especially WiFi 7.
- Cons: You need compatible hardware on both ends (router and device). Plus, more antennas can mean a chunkier router—but honestly, the performance gains are worth it.
Bottom line: If you’re using anything from WiFi 5 and up (and especially WiFi 6/6E/7), you want MIMO. It’s the difference between a network that just “works” and one that flies—even with a whole family streaming, gaming, and Zooming at once.
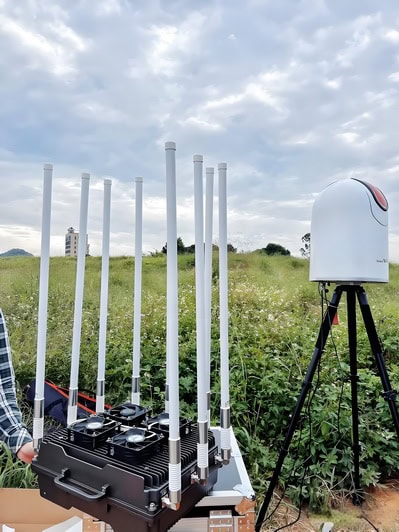
Indoor vs. Outdoor Antennas – Where Are You Placing It?
Here’s another biggie: where are you actually mounting that antenna? Because, believe me, indoor and outdoor antennas are built for totally different challenges.

- Pros: Designed for aesthetics and safety, these blend right into your home or office. They’re usually optimized for shorter ranges and fewer environmental hazards.
- Cons: You’re limited by walls, floors, and household interference. Sometimes, you just can’t get enough range.
- Pros: Built tough to handle weather, temperature swings, and UV. They’re perfect for beaming WiFi across open spaces—think yards, campuses, or between buildings.
- Cons: Installation can be trickier, and you’ll want to weatherproof your cables and connections. Also, they tend to stand out a bit more (unless you like the industrial look).

Pro Tip: If you need to cover a big backyard, connect two buildings, or just want WiFi out at the pool, outdoor antennas are your best friend. Indoors, stick to antennas optimized for home environments.
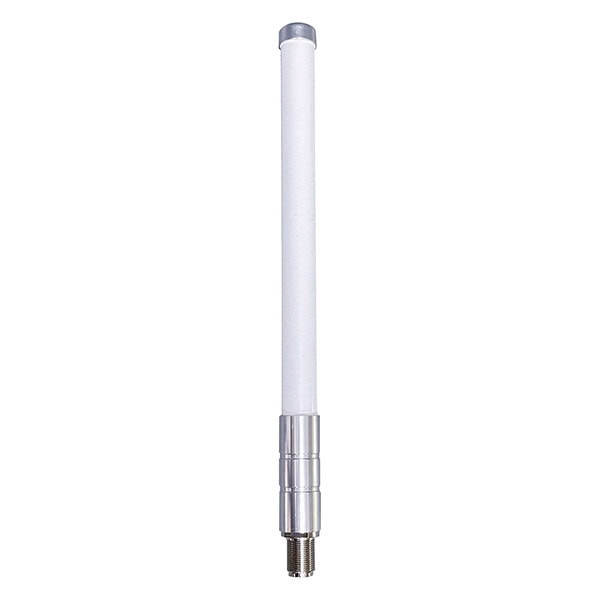
Dipole Antennas – The Trusty All-Rounder
When you picture a router antenna, you’re probably thinking of a dipole. They’re the most common type and the workhorse of the WiFi world for a reason.
What they are: Dipole antennas are omnidirectional, so they radiate signal in a 360-degree pattern. Imagine the signal as a slightly flattened donut around the antenna.
Best for: General coverage in a home or single-floor office. They give you reliable, balanced coverage over a wide area.
Pro Tip for Positioning: That “donut” shape is key! The signal is weakest directly above and below the antenna.
For a single-story home: Keep the antennas pointed straight up (vertical). This spreads the signal horizontally across your floor.
For a multi-story home: Try one antenna vertical for the main floor, and one horizontal (90 degrees) to push the “donut” of signal up and down, helping cover floors above and below.
With WiFi 6/6E/7, your router will likely come with high-quality dual-band or tri-band dipoles, ready to handle 2.4, 5, and 6 GHz frequencies.
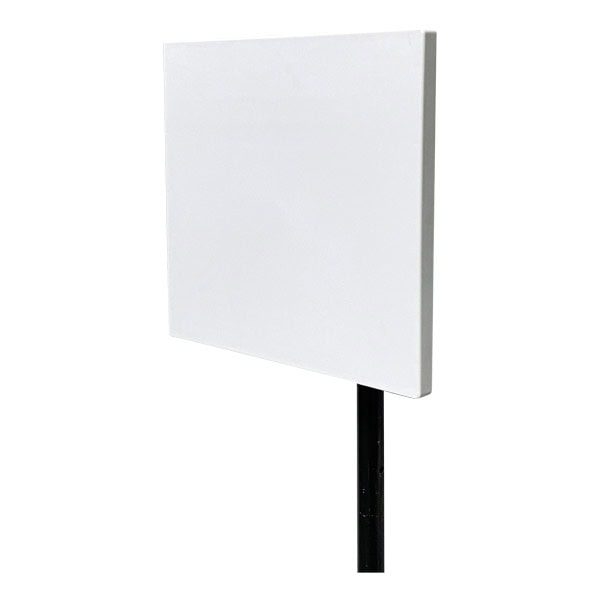
Patch Antennas – Your Signal Spotlight
But what if you don’t need to cover your whole house? Maybe you just want a rock-solid, unwavering signal in one specific spot—like your home office or gaming setup in the attic?
Enter the patch antenna.
What they are: Patch antennas are directional, usually flat and rectangular. They focus the WiFi signal in a specific direction, instead of spreading it everywhere. Think of it like swapping a lantern (dipole) for a flashlight (patch). You lose the wide area, but you can shine much further in the direction you want.

Best for: Sending a strong signal to a single room, connecting to a detached garage, or covering a long, narrow hallway. They’re fantastic for getting through stubborn walls.
For WiFi 6/6E/7: The 6 GHz band is blazing fast, but not the best at punching through walls. A patch antenna is perfect for “punching” that high-frequency signal right where you need it most.
Panel Antennas – The Heavy Hitter
Now we’re talking serious hardware. If a dipole antenna is a lantern, a panel antenna is a spotlight.
What they are: Panel antennas are directional, generally larger and more powerful than dipoles. They provide high gain and a focused beam, making them perfect for long-range communication.
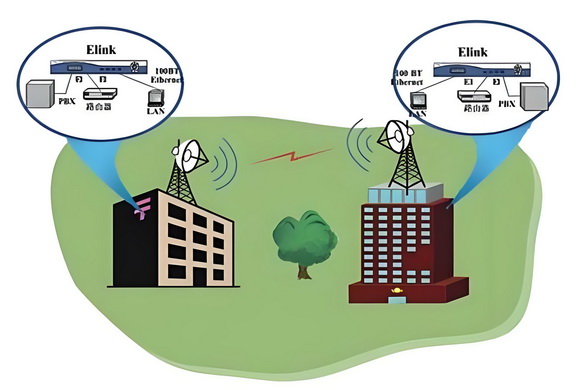
Best for: Point-to-point links between buildings—say, your house and a workshop a few hundred feet away. They’re also used in big indoor spaces like warehouses, where you need to project a signal down long aisles.
My experience: I once helped a friend who couldn’t get a signal in his detached workshop. We mounted a pair of panel antennas—one on his house, one on the workshop, pointed right at each other. He went from zero bars to streaming 4K video without a hiccup. When used right, they’re incredibly effective.
Sector Antennas – The Coverage Slicer
Ever wish you could slice up your WiFi coverage and send it to just one chunk of your property or building? That’s the magic of sector antennas.
What they are: Sector antennas are directional, but instead of a narrow beam, they cover a wide “slice” (think 60° to 120°) of area. Picture a big slice of pie—everything in that wedge gets coverage.

Best for: Outdoor WiFi in parks, stadiums, or large warehouses; anywhere you want to cover a wide area without wasting signal everywhere else. They’re a favorite for wireless ISPs and campus-wide networks.
Pro Tip: You can combine multiple sector antennas, each pointing in a different direction, to blanket an entire outdoor area without overlap or dead zones.
Parabolic Dish Antennas – The Long-Range Sniper
Now, if you really need to go the distance—like, really—this is where parabolic dish antennas come in.
What they are: These are the “satellite dish” style antennas. They use a parabolic reflector to focus the WiFi signal into a super-tight, high-gain beam. Think of a sniper rifle instead of a shotgun.
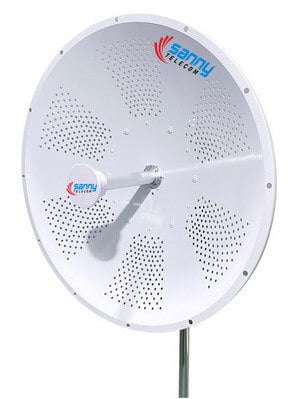
Best for: Point-to-point connections over long distances—like linking two buildings across a big field, or even across town if you’ve got line of sight. They’re also used in some outdoor mesh networks for backbone links.
Heads-up: Parabolic dishes are overkill for most homes, but if you need rock-solid, ultra-long-range WiFi, nothing else comes close.
MIMO & Multi-Beam Antennas – The Secret Sauce of Modern WiFi
Ever wonder why new WiFi 6 or WiFi 7 routers have four, six, or even eight antennas? It’s not just for show. It’s all about enabling the tech that makes modern WiFi so awesome: MIMO.
MIMO (Multiple Input, Multiple Output): In plain English, MIMO lets your router use multiple antennas to talk to multiple devices at the same time. Old routers had to switch between devices super fast, like a frantic postal worker sorting mail one piece at a time. With MU-MIMO (the “Multi-User” version in WiFi 6/7), your router can send out multiple streams at once. It’s like having several postal workers, all sorting mail at the same time.
Beamforming (Multi-Beam): This is where it gets really smart. On top of MIMO, modern routers use beamforming. Instead of just blasting the signal in all directions, the router figures out where your devices are and focuses a concentrated beam right at them. Move your laptop, and the beam follows you. It’s super efficient and a key feature that only works with a multi-antenna setup.

For WiFi 6, 6E, and especially WiFi 7, a solid MIMO and beamforming antenna array isn’t just a nice-to-have—it’s absolutely essential. Features like OFDMA and Multi-Link Operation (MLO) simply can’t work without it.
Choosing the Right Antenna for Your Needs
Alright, let’s get down to brass tacks. Theory is great, but you’re here to figure out exactly what to buy for *your* specific situation. Think of this as the personalized recommendation part of our chat. I’ve broken it down into the most common scenarios I see.
✅ Home & Office Use
For the everyday grind of work-from-home life, streaming movies, and keeping a family’s worth of devices online, you need solid, reliable coverage everywhere. Your goal isn’t to blast a signal to the moon; it’s to make sure the connection doesn’t drop when you take your laptop from the living room to the kitchen.
Best Antennas: Omni-directional antennas, specifically dipole antennas in the 5-8 dBi range.
Why? An omni-directional antenna is the workhorse of general coverage. It broadcasts the signal in a 360-degree pattern, like a donut spreading out from the router. This design is perfect for bathing multiple rooms on the same floor with a consistent signal. A 6-8 dBi gain gives you that extra bit of horizontal reach to push the signal to the far corners of a larger house without creating a “dead zone” on the floor above or below, which can happen with ultra-high gain models.
🎮 Gaming & Low-Latency Apps
If you’re a gamer, you know that lag is the enemy. A stable, low-ping connection is even more important than raw download speed. For gaming, video conferencing, or any real-time application, your priority is a clean, interference-free signal path between your router and your primary device (like your PC or console).
Best Antennas: A directional antenna, such as a 9 dBi patch or panel antenna.
Why? This is all about focus. Instead of spreading the signal everywhere, a directional antenna acts like a spotlight, concentrating the router’s energy directly at your gaming setup. This focused beam minimizes interference from other devices and obstacles, leading to a much more stable connection and a lower, more consistent ping. It’s the ideal way to create a dedicated, high-performance link for your most important connection.
🏠 IoT & Smart Homes
The modern smart home is a battlefield of signals. You’ve got smart plugs, lights, thermostats, speakers, cameras, and who knows what else, all chattering away at once. This isn’t about speed to a single device; it’s about the router’s ability to juggle dozens of small connections without dropping any of them.
Best Antennas: A multi-polarized MIMO (Multiple-Input, Multiple-Output) antenna system.
Why? This is where using multiple antennas really shines. A MIMO setup uses several antennas, often with different polarizations (some vertical, some horizontal), to create multiple, robust data streams. This allows the router to communicate with many different smart home devices simultaneously and efficiently. The varied polarization helps ensure a solid connection to your IoT gadgets, no matter their location or orientation, ensuring your smart home runs smoothly without constant dropouts.
🌳 Outdoor & Long-Range
Need to get WiFi from your house to a detached workshop, guest house, or just want to cover a big backyard? This is a whole different challenge. Now you’re dealing with distance, trees, and thick walls—so you need the right gear.
Best Antennas: High-gain panel antennas or parabolic grid/dish antennas.
Why? These are the heavy hitters of the WiFi world. High-gain panel antennas focus your signal in a specific direction, making them great for long, straight shots. Parabolic grid or dish antennas (think mini satellite dishes) take it even further, concentrating the signal into a super narrow beam for maximum range. By focusing all that power in one direction, these antennas can bridge distances that regular antennas just can’t handle. If you need a strong, reliable point-to-point link outdoors, these are the way to go.
Choosing Your Champion: The Best Antennas for Each WiFi Standard
Alright, this is the main event. Now that you speak the language, let’s match the right antenna to the right WiFi standard based on your needs.
Antennas for WiFi 6: The Solid All-Rounders
If you’re running a WiFi 6 network, your focus is on efficiency and solid coverage on the 2.4 GHz and 5 GHz bands.
What to look for: A quality “dual-band” omni-directional antenna. Don’t waste money on tri-band antennas if your router is only WiFi 6, as you can’t use the 6 GHz band anyway.
Gain: For most homes and apartments, a set of 5 dBi antennas is the sweet spot. This provides a great balance of horizontal and vertical coverage.
MIMO is your friend: WiFi 6 thrives on MIMO. If your router has three, four, or even eight antenna connectors, use all of them! Don’t think you can just use one or two. The system is designed to use multiple antennas to talk to multiple devices. Make sure you purchase a full set of matching antennas.
My Pick: A set of well-made, 5 dBi dual-band omni-directional antennas with a low VSWR rating from a reputable brand will serve a WiFi 6 setup beautifully.
Antennas for WiFi 6E: Tapping into the 6 GHz Goldmine
With a WiFi 6E router, your entire goal is to leverage that beautiful, empty 6 GHz band. This has one non-negotiable requirement.
The Non-Negotiable: You ‘must‘ buy a “tri-band” antenna that explicitly states it covers the 6 GHz frequency band (which extends up to 7.125 GHz). Your old WiFi 6 antennas are physically not designed to resonate at this higher frequency. Using them would be like trying to listen to an FM radio station on an AM-only receiver.
But there’s more to picking the right antenna than just frequency support. Just as with cutting-edge smart devices, the “engineering” of your antenna setup matters. Miniaturization, internal design, and build quality all play a role in how well that tri-band antenna actually performs once it’s screwed onto your router. Look for antennas that integrate quality components and are built to last—cheap, hollow-feeling options often deliver hollow results.
Don’t Be Fooled: Some sellers might market an antenna as “WiFi 6 compatible,” but that doesn’t mean it supports WiFi 6E. Look for “Tri-Band,” “WiFi 6E,” or explicit mention of the “6 GHz band” in the specifications.
Placement Matters More: Higher frequencies like 6 GHz have a harder time penetrating walls and other obstacles compared to 2.4 GHz. This makes antenna placement even more critical. You’ll want your WiFi 6E router to be as centrally located as possible to give that 6 GHz signal the best chance of reaching your devices.
Durability and Integration: Since WiFi 6E antennas are pushing the limits of current wireless tech, don’t skimp on quality. A well-engineered antenna isn’t just about better signal—it’s about long-term durability, consistent performance, and smooth integration with your router’s other components. Your setup should be a cohesive system, not just a collection of parts slapped together.
In short, the right WiFi 6E antenna isn’t just a checkbox—it’s a smart investment in your network’s real-world speed and reliability.
My Pick: For a WiFi 6E setup, you need a set of tri-band omni-directional antennas. Again, around 5-7 dBi is a great choice for most homes to balance range with coverage.
Why WiFi 6E Antennas Are a Game Changer
Beyond the basics, WiFi 6E antennas bring some serious upgrades to the table:
- 1200 MHz of Fresh Bandwidth: The 6 GHz band gives you a whopping 1200 MHz of extra frequency, which means up to 14 additional 80 MHz channels or 7 extra 160 MHz channels. Translation: way more room, way less congestion.
- Top-Tier RF Performance: These antennas are engineered for robust, state-of-the-art bandwidth and signal strength, so you can actually experience the speeds your router promises.
- Flexible Form Factors: You’ll find both on-board and cabled versions, with options in PCB (printed circuit board) and FPC (flexible printed circuit) materials. Whether you’re upgrading a desktop, a mesh node, or something a bit more DIY, there’s a fit.
- Customization Galore: Need a specific cable length or connector type? Prefer a certain MIMO (Multi-input Multi-output) configuration for your space? Most quality antennas offer a range of customization options, so your setup can be as tailored as your home theater.
- Future-Proofing: Many WiFi 6E antennas are already Wi-Fi 7 capable, so you won’t be left behind when the next standard rolls out.
In short, if you want to truly exploit the 6 GHz “goldmine,” don’t just grab any antenna—go for one that’s built for next-gen speed, reliability, and flexibility. Your future self (and your streaming devices) will thank you.
Antennas for WiFi 7: Gearing Up for Multi-Link Mayhem
WiFi 7 is the pinnacle of current wireless technology, and it requires antennas that can keep up with its demanding features, especially MLO.
The Cutting Edge: Just like with 6E, you need a high-performance **tri-band** antenna. But for WiFi 7, the quality and engineering matter even more. The antenna needs to maintain consistent, efficient performance across all three bands simultaneously.
Band Isolation: This is a key factor in high-quality WiFi 7 antennas. They need to be engineered with superior isolation to prevent the signals from the different bands from “leaking” and interfering with each other. This is crucial for MLO to work effectively.
Future-Proofing: Investing in a quality set of WiFi 7-ready antennas means you’re set for the foreseeable future of wireless tech. These antennas will, of course, be backward compatible and provide excellent performance for 6E, 6, and older devices as well.
My Pick: Choose a premium tri-band antenna set from a manufacturer known for performance and quality engineering. Pay close attention to specs like VSWR to ensure you’re getting an antenna that can handle the complex demands of Multi-Link Operation.
Installation and Optimization: You’ve Got the Gear, Now Make it Sing
I can’t stress this enough: buying the right antenna is only half the battle. How you install and position it can make a world of difference. It’s free performance, and you’d be crazy not to take it.
The “Don’ts” of Router and Antenna Placement
I’ve seen some truly tragic router placements in my time. Avoid these common mistakes at all costs:
The Electronics Graveyard: Don’t shove your router behind the TV, next to your stereo receiver, or surrounded by other electronic devices. They are all sources of interference.
The Metal or Concrete Bunker: Avoid placing your router inside a metal cabinet, on a metal shelf, or right next to a concrete wall. These materials are signal killers.
The Kitchen Nightmare: The kitchen is often a bad spot. Microwave ovens, in particular, operate on the 2.4 GHz frequency and can wreak havoc on your signal when in use.
The Floor is Lava (for WiFi): Never place your router on the floor. WiFi signals tend to radiate outwards and slightly downwards. You want it elevated, at least to desk or table height.
The Art of Antenna Positioning
For a standard home setup with a single router, follow these simple rules:
1. Go Central: Place the router as close to the center of your home as possible. This gives the signal the most equitable path to all corners of the house.
2. Get it Up High: An elevated, open-air position is always best. On top of a bookshelf (not one crammed with books) is a great spot.
3. Angle for Success: For a router with multiple antennas, don’t point them all straight up. For optimal performance, you want to cover different polarizations. A good starting point is to orient the antennas perpendicular to each other. If you have three or more, angle them at 90, 45, and 135 degrees. This creates a more robust signal “net” to catch devices in any orientation.
Mount It Like You Mean It: Choosing Mounting Types and Brackets
Now, let’s talk about mounting—because where and how you mount your antenna matters just as much as where you put your router. Here are the main types and what you need to know:
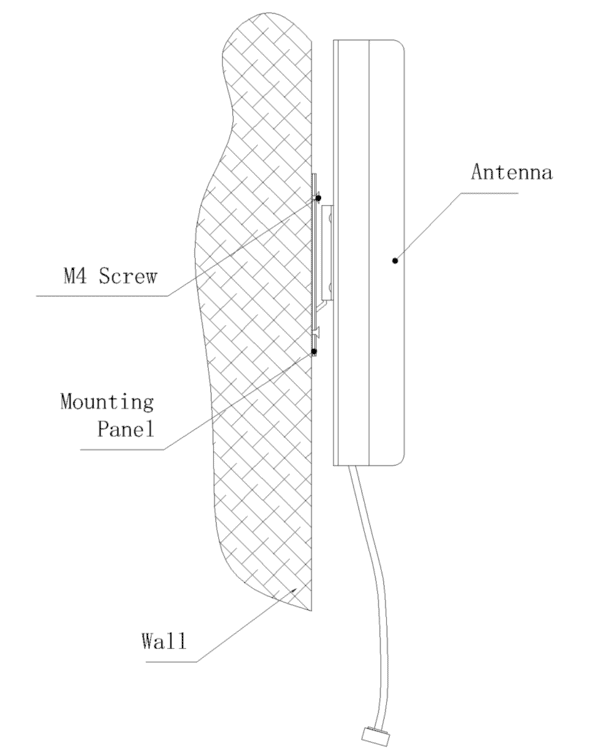
- Wall Mounts: Great for fixed locations where you want a tidy, out-of-the-way setup. Just make sure you’re not mounting it on a concrete or metal wall (see above!). Use sturdy wall brackets and avoid cramming it into a corner.
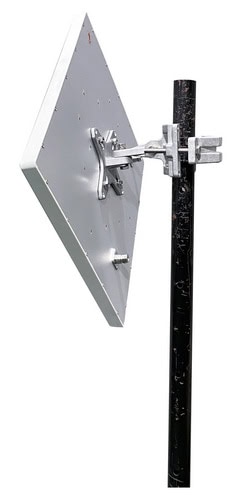
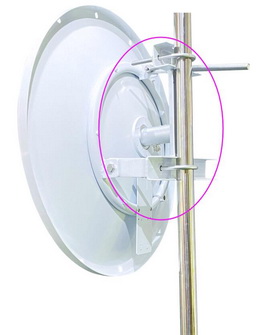
- Pole Mounts: Perfect for outdoor or attic antennas. A pole mount can get your antenna up high, clear of obstacles, and away from household interference. Make sure you use weatherproof brackets if you’re mounting outside.
- Ceiling Mounts: Ideal for large, open spaces or multi-story homes. Ceiling mounts can help distribute signals more evenly, especially in tricky layouts.

- Desktop or Shelf Mounts: Sometimes, the simplest solution is best. Placing your router and antenna on a bookshelf or open desk can give you flexibility and easy access for adjustments.
Bracket Selection Tips:
- Choose brackets that match the weight and size of your antenna. Flimsy hardware is an invitation for disaster.
- Look for adjustable brackets if you want to fine-tune antenna orientation.

- For outdoor installations, pick rust-resistant or stainless steel brackets—trust me, you don’t want to replace them every year.
A Note on Cables and Connectors
This is one of those classic “gotchas” that’s caught me off guard before. When you’re looking to upgrade your WiFi antennas, matching the connector type is absolutely essential. There isn’t just one standard—N-type, SMA, and RP-SMA (Reverse Polarity SMA) connectors are all commonly used, depending on the device and antenna.
If you’re aiming for better performance with high-gain or specialty antennas, double-check the connector type on both your router and the new antenna before you buy any cables or adapters. Mixing up connectors is a super easy mistake to make, but it can be a real headache to fix later!
Connectors:
SMA (SubMiniature version A): The regular SMA male connector has a pin in the center, and the female has a hole. This is the standard for many RF applications, but not what most consumer WiFi routers use.
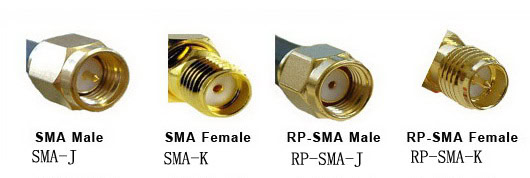
RP-SMA (Reverse Polarity SMA): Here’s the “gotcha” — with RP-SMA, the male connector actually has a hole in the center, and the female connector has a pin. Most home WiFi routers and antennas use this type, so double-check! If your router’s connector has a pin sticking out, you want an RP-SMA female antenna. If it’s a hole, you want RP-SMA male.
N-Type: These are much bigger and usually found on outdoor or high-power WiFi equipment (like long-range antennas). Standard N-type connectors have the male with a pin and the female with a hole—just like regular SMA, not reversed like RP-SMA. They’re also threaded and way more robust.

Take a close look at the connector on your router. Does it have a pin sticking out? Then you’ll need a female connector on your new antenna cable. Does it have a hole? Then you’ll need a male connector. Keep in mind, there are different types of connectors like N-type, SMA, and RP-SMA, so double-check the product page before you buy. It’ll save you the headache of a return.
Cables:
The type of coaxial cable you use also matters, especially for longer runs or high-performance antennas. Here are some common types you’ll see:
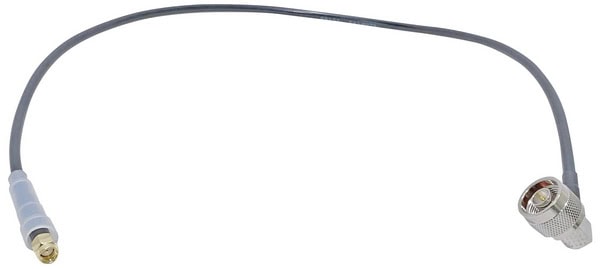
RG58: This is a common, flexible coaxial cable, but it has higher signal loss, especially over longer distances.
LMR195: A popular upgrade over RG58, LMR195 has lower loss and is great for most home WiFi setups.

LMR240: This cable offers even lower loss than LMR195, making it a good middle ground—better performance without being as thick or stiff as LMR400.
LMR400: If you need to run cable over a longer distance or want the absolute lowest loss, LMR400 is the way to go—but it’s thicker and less flexible.
So, before buying that awesome high-gain panel or parabolic antenna, double-check your connector type and choose the right coaxial cable for your needs. It’ll make a big difference in your WiFi performance and save you a lot of frustration down the line.
Conclusion
Whew, we covered a lot! From the efficiency of WiFi 6 to the wide-open spaces of 6E and the multi-link magic of WiFi 7, one thing is clear: the antenna you choose is your ticket to a better wireless experience. It’s the unsung hero of your network. I hope this guide has demystified the specs and armed you with the confidence to pick the perfect antenna for your needs. What’s been your biggest WiFi headache? Let me know.
